

Style
Pick a caption style, customize it, and lay out the video with layers, logos and aspect ratios.
The Style tab sets how your subtitles, and everything else on the video, look in the preview and in rendered videos. Style belongs to the project: every language version uses the same style. Your changes save to the project automatically about a second after you stop.
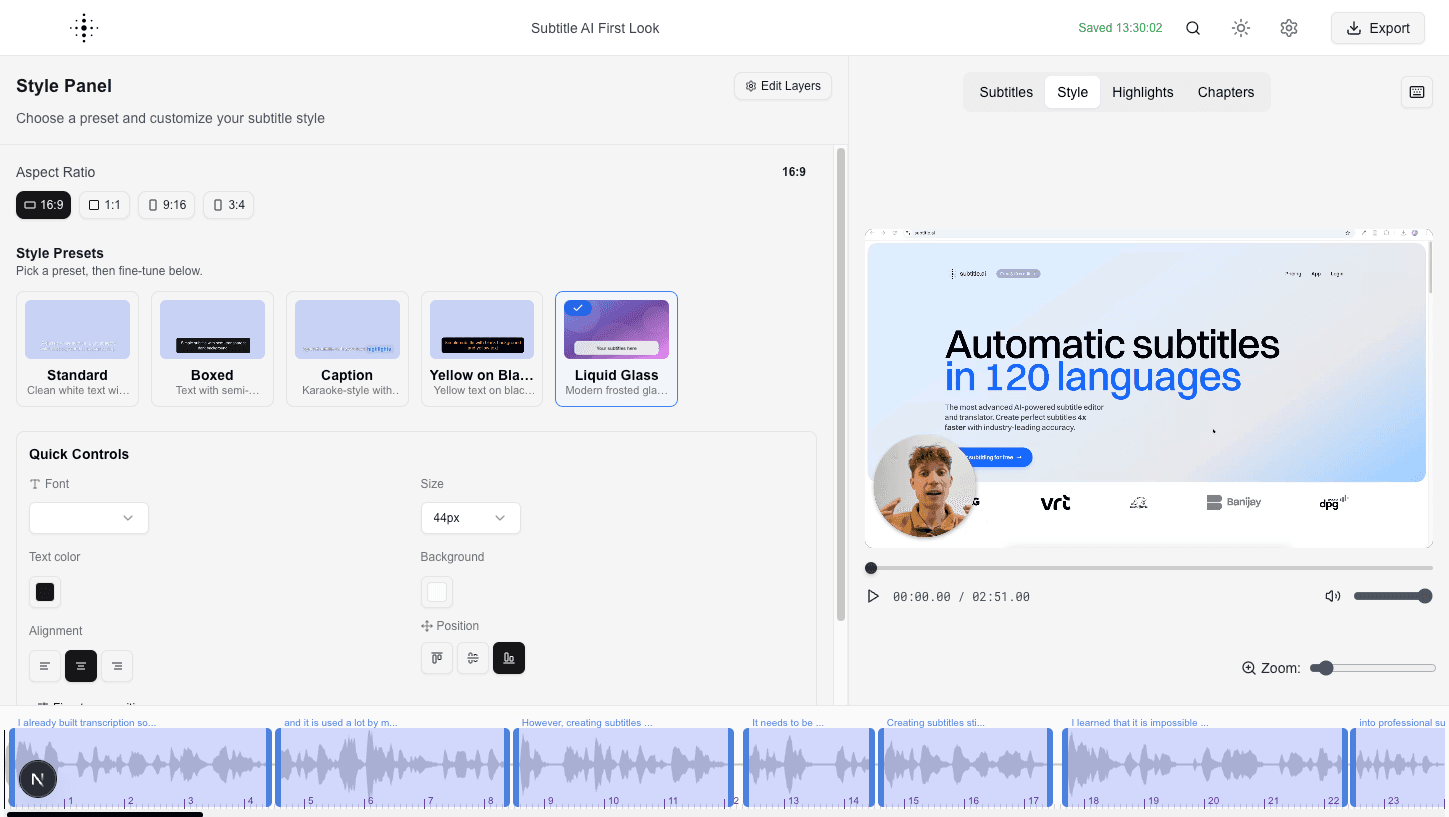
Open the Style panel
- In the editor, click the Style tab. You can also click a caption or another layer in the video preview.
- The panel has two tabs. Presets holds the style gallery, the aspect ratio and Quick edit. Customize holds every setting of the layer you selected.
On a phone, the Style panel opens on the presets, with a Text size slider below them. Aspect ratio, saving presets and Quick edit are under More options.
Caption style presets
- Open Style > Presets.
- Choose Animated or Static.
- To narrow the list, type in Search presets... or click a category: Short-form, Karaoke, Clean, Bold, Podcast or Team.
- Click a style. It applies straight away, and the preview shows it.
Each card shows a live preview of the style. Applying a built-in style replaces your subtitle style and position.
Built-in styles for video projects:
| Group | Styles |
|---|---|
| Static | Standard, Broadcaster, Boxed, Yellow on Black |
| Animated | Caption, Liquid Glass, Liquid Glass (Per Line), Beast Pop, Impact Stack, One Word, Comic Bounce, Creator Classic, Inverse Pill, Pill Track, Neon, Karaoke Fill, Podcast Card |
Audio projects show audio templates instead. See Audiograms.
Save a style for your team
Organization owners and admins can save the current look as a preset that everyone in the organization can use.
- Style a project the way you want it.
- Open Style > Presets and click Save as preset.
- Enter a name and confirm.
The preset appears under Team in the gallery. It keeps every layer with its styling, and the aspect ratio. It does not keep images, logos or video: add those in each project.
When you change a project that uses a team preset, the row under the gallery says Modified in this project. Your changes stay in this project only. To change the preset for the whole organization, click Update and confirm. Team presets cannot be renamed or deleted in the app.
Customize your subtitles
For quick changes, use Quick edit on the Presets tab: Font, Size, Text color, Background, Alignment and Position, with Fine-tune position for exact pixels.
For everything else:
- Click the subtitles in the preview, or select the subtitle layer in the layer list.
- Open Style > Customize.
| Section | What you can set |
|---|---|
| Text & Font | Font Family, Font Size, Font Weight, Text Alignment, Line Height and Letter Spacing |
| Colors & Shadow | Text Color, Background Color, Text Shadow (offset, blur and color) and Text Outline (thickness and color) |
| Position | Snap Position to the top, middle or bottom and left, center or right, or exact pixels under Fine-tune (optional) |
| Behavior | How many words or lines show at once, and Highlight timing. See Word-by-word captions |
| Highlight Style | The look of the highlighted word |
| Motion | Animations when a subtitle appears, changes and leaves |
The fonts include caption fonts such as Montserrat, Anton, Archivo Black and Bangers, and they look the same in the preview and in rendered videos. Colors take an opacity, so you can make a background see-through.
You can also place the subtitles by hand. Pause the video, click the subtitles in the preview, and drag them, or drag a corner to resize the box. The toolbar under the selection centers it horizontally or vertically.
Word-by-word captions
Animated captions highlight each word as it is spoken.
- Open Style > Customize with the subtitle layer selected.
- Under Behavior, choose a Display:
- Current line: only the line being spoken.
- All lines: the whole subtitle.
- One word at a time: a single word.
- Under Highlight Style, turn on Enable Highlight, then set its Highlight Background, Highlight Text Color, Highlight Scale, Highlight Tilt, Padding and Corner Rounding. Smooth transition glides the highlight from word to word.
- Under Motion, pick an Enter Preset, Exit Preset and Between-Text Preset: None, Fade, Lift, Drop, Slide Left, Slide Right, Soft Scale or Settle. Duration (in frames) and Intensity apply to all three. They animate the whole caption, not single words.
Styles such as Karaoke Fill, Neon and Liquid Glass fill each word as it is spoken. Start from one of them in the gallery for that effect.
Highlight timing
If the highlight runs slightly ahead of or behind the speech, move it under Behavior > Highlight timing. The slider goes from 500 ms Earlier to 500 ms Later, in 10 ms steps. Reset sets it back to 0.
It moves only the highlight. Your subtitle times and exported files do not change. With Current line, it also moves when the next line appears. To fix the timing of single words instead, see Word timing.
Aspect ratios
Make widescreen, square and vertical versions of the same video.
- Open Style > Presets.
- Under Aspect ratio, click 16:9, 1:1, 9:16 or 3:4.
| Ratio | Size in pixels | Typical use |
|---|---|---|
| 16:9 | 1920 × 1080 | YouTube, widescreen |
| 1:1 | 1080 × 1080 | Square social posts |
| 9:16 | 1080 × 1920 | Reels, Shorts, TikTok |
| 3:4 | 1080 × 1440 | Portrait feed posts |
The video fills the new frame and is cropped around its center, without black bars. Subtitles and other layers are resized to match. The rendered video uses the same ratio as the preview.
Layers
Add text, shapes, images, a waveform or a second copy of the video on top of your footage.
- In the Style panel header, click the layers button. It shows Layers and the number of layers, or the name of the selected layer.
- Open Add overlay and pick Text, Image, Video, Shape, Subtitle or Waveform.
- The new layer is selected. Set it up on the Customize tab, and drag it into place in the preview.
Video and waveform layers always use the project's own media. A new layer starts at a fixed spot, which can be partly outside the frame, so move and resize it after you add it.
In the layer list:
- The layer at the top is in front. Drag a layer by its handle to change the order.
- Click the eye to hide a layer. Hidden layers are left out of rendered videos too.
- Double-click a name to rename the layer.
- Click the bin to delete a layer. There is no confirmation.
In the preview, pause the video and click a layer to select it. Drag it to move it, and drag a corner to resize it. The arrow keys nudge it by 1 pixel, or 10 with Shift. Delete removes it and Esc deselects it.
Every layer has a Timing section. Set Start (s) and Duration (s) to show it for part of the video, or click Entire duration.
Logos and images
Put a logo, a watermark or a background picture on the video.
- In the layer list, open Add overlay and pick Image.
- On the Customize tab, open Image Source and click Pick.
- In the window that opens, choose an image under Browse Assets, or add one under Upload New.
- Click Select Image.
- Drag and resize the image in the preview.
Images you upload go into your organization's image library, so everyone in the organization can use them. Only owners and admins can upload. An image can be up to 10 MB, and must be a picture format such as PNG or JPG; SVG files are not accepted. The library shows your organization's 20 most recent images, and images cannot be deleted from it in the app.
The image layer's settings include Object Fit, Corner Rounding, Border, Padding, Image Effect, Opacity and enter and exit Animation.
Audiograms
Turn a podcast or radio clip into a video you can share.
When you upload an MP3, WAV, M4A or AAC file, the project starts with the Modern Podcast layout: a gradient background, a cover image, the project name as the title, an animated waveform and the subtitles. To finish it:
- Open Style, open the layer list and select the text layer that reads Episode #001. Change the text on the Customize tab, or hide the layer.
- Select the image layer, then on Customize click Image Source > Pick and choose your cover. Until you do, the cover is your organization's most recently uploaded image, or a placeholder.
- To try another look, open Presets. Audio projects offer Audiogram, Clear Parallax, Gradient Audiogram, Modern Podcast and Minimalist Audio. Applying one replaces every layer, including your changes.
- Render it like any video. See Export.